(This option is not available on the Freeware version)
A number of WinTopo's image processing functions have to make a determination as to which pixels are considered part of the image detail and which pixels are part of the background.
By default WinTopo determines the background pixels automatically. For the majority of images the default operation works very well, but some types of image may benefit from a different setting. For instance, images which have a coloured background, a darkended background, or where the background is darker than the image detail (for example, a blueprint).
The Background Pixel Identification feature is for three types of raster image...
All of the above problems could be overcome by use of the Brightness, Contrast and Negative adjustments instead, but not without changing the colours of the lines on the drawing.
Accordingly, there is the Identify Background Pixels... option on the Image menu. Selecting this option brings up this window...
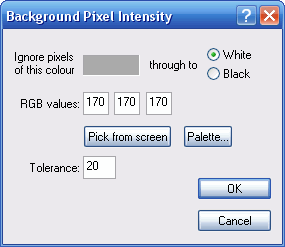
This window allows you to identify the range of pixel colours that are to be considered background (not part of the image details).
The range of colours extends from the shown colour (in the sample box and the numeric Red-Green-Blue (RGB) intensity values) through to white (RGB 255, 255, 255).
By selecting the darker setting instead of the lighter setting, the range can be inverted to cover the shown colour through to black (RGB 0, 0, 0). With this setting you can process an image which has a dark background with light coloured details (for example, a negative, blueprint, or screen grab).
You can select the cut-off colour for the range by clicking the Pick from screen button, and then click on a background pixel in your raster image. The RGB value of that pixel will be shown in the RGB boxes and a sample of the colour is shown in the sample box.
Often the background of a raster is not a unifom colour. This is especially true for JPG images. In general, if you pick the colour of one pixel from the background of the image, there will be other pixels on the background which are just outside of that colour range. Therefore, there is a Tolerance value to determine how accurate the picked colour is - i.e. the background is the specified colour including other pixels which are nearly the same colour.
A Tolerance value of 0 (zero) indicates that the specified colour is the absolute edge of the colour range. The default Tolerance is 20, which should be sufficient for most images where the background is fairly uniform. If you have an image with a significantly varying background colour range, you can increase the Tolerance value to catch a wider range of colours.
Here is an example. If you have a greyscale or colour image where the image detail varies in intensity significantly, the default setting may not vectorise all the lines - the lighter intensity lines may get left out.
This is a sample of an image with significantly varying detail intensity. And next to it is the vectorisation result with the default Background Pixel setting.
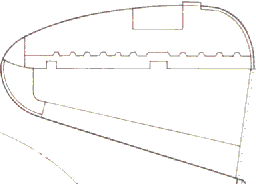
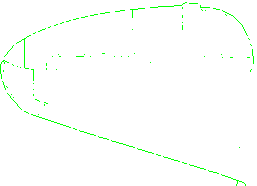
You can see that only the darker details from the raster image get converted to the vector drawing. This is because some of the line details are too light for the default operation..
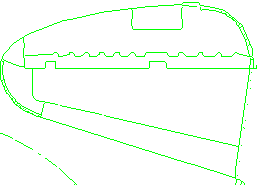
Here is the vector result after selecting the background pixel colour with the Pick from screen option...
This setting affects nearly all of WinTopo Pro's image processing features...
Related Topics: